基本命令
hexo clean #/清除静态页面缓存(清除 public 文件夹)

hexo g #生成或 hexo generate

hexo s #启动本地服务器 或者hexo server,这一步之后就可以通过localhost:4000查看了

hexo d #部署到github

hexo clean & hexo g & hexo s #一键启动
hexo new page xxx #创建页面
命令       文件目录

post    source/_post       新建一个文章

draft   source/_drafts     新建一个草稿文件

page    source             新建一个页面文件
hexo添加分类和标签:
---
title: title #文章標題
date: 2016-06-01 23:47:44 #文章生成時間
categories: "Hexo教程" #文章分類目錄 可以省略
tags: #文章標籤 可以省略
     - 标签1
     - 标签2
 description: #你對本頁的描述 可以省略
---
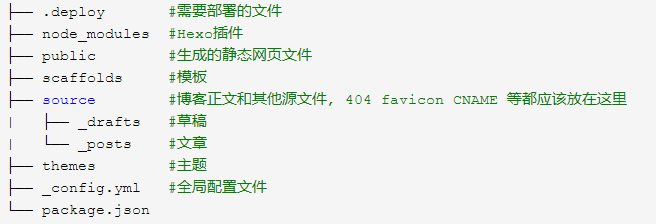
hexo目录结构
markdown编辑器
说明:在Hexo中插入图片时,请按照以下步骤进行设置
(1)将站点配置文件中的 post_asset_folde 选项设置成 true
(2)在站点文件夹中打开 git bash,输入命令 npm install hexo-asset-image –save 安装插件
(3)此时使用 hexo new title 创建文章时,将同时在 source/_post 文件夹中生成一个与 title 同名的文件夹,我们只需将待添加的图片放进此文件夹中,然后在文章中通过 Markdown 语法进行引用即可例如,在资源文件夹(就是那个与 title 同名的文件夹)中添加了图片 example.PNG,则可以在对应的文章中使用语句  添加图片
使用 Hexo Admin 插件(难用)
Hexo Admin 是一个本地在线式文章管理器,可以用直观可视化的方式新建、编辑博客文章、page页面,添加标签、分类等,并且支持剪贴板粘贴图片(自动在source_images_目录中创建文件)
在Hexo网站目录下,安装 Hexo Admin 插件
npm install –save hexo-admin
启动本地服务器并打开管理界面,即可使用
hexo server -d
open localhost:4000/admin/
markdown表格调整宽度
1 | <style> |
这里需要一点 CSS 知识,选择器的问题,首先 <th> 存在于 <table> 中;其次 th:first-of-type 的意思是每个 <th> 为其父级的第一个元素,这里指的就是围绕着【名称】的 <th>。同理第二、三个使用 th:nth-of-type(2)、th:nth-of-type(3) 就可以了,以此类推。上述的 th:first-of-type 等于 th:nth-of-type(1)。
Markdown编辑表格时如何输入竖线
主要思路: 竖线用 | 或者 | 来代替,后加分号
参考资料:
https://www.cnblogs.com/jackyroc/p/7681938.html
https://www.cnblogs.com/fengxiongZz/p/7707219.html