Dagger 2 是 Java 和 Android 下的一个完全静态、编译时生成代码的依赖注入框架,由 Google 维护,早期的版本 Dagger 是由 Square 创建的。
Dagger 2 是基于 Java Specification Request(JSR) 330标准。利用 JSR 注解在编译时生成代码,来注入实例完成依赖注入。
Dagger2 几个注解
@Inject 带有此注解的属性或构造方法将参与到依赖注入中,Dagger2会实例化有此注解的类。标注的成员属性不能是private
@Module 带有此注解的类,用来提供依赖,里面定义一些用@Provides注解的以provide开头的方法,这些方法就是所提供的依赖,Dagger2会在该类中寻找实例化某个类所需要的依赖。
@Component 用来将@Inject和@Module联系起来的桥梁,从@Module中获取依赖并将依赖注入给@Inject。只能标注接口或抽象类,声明的注入接口的参数类型必须和目标类一致。
约定俗成的是@Provides方法一般以provide为前缀,Moudle 类以Module为后缀,一个 Module 类中可以有多个@Provides方法。
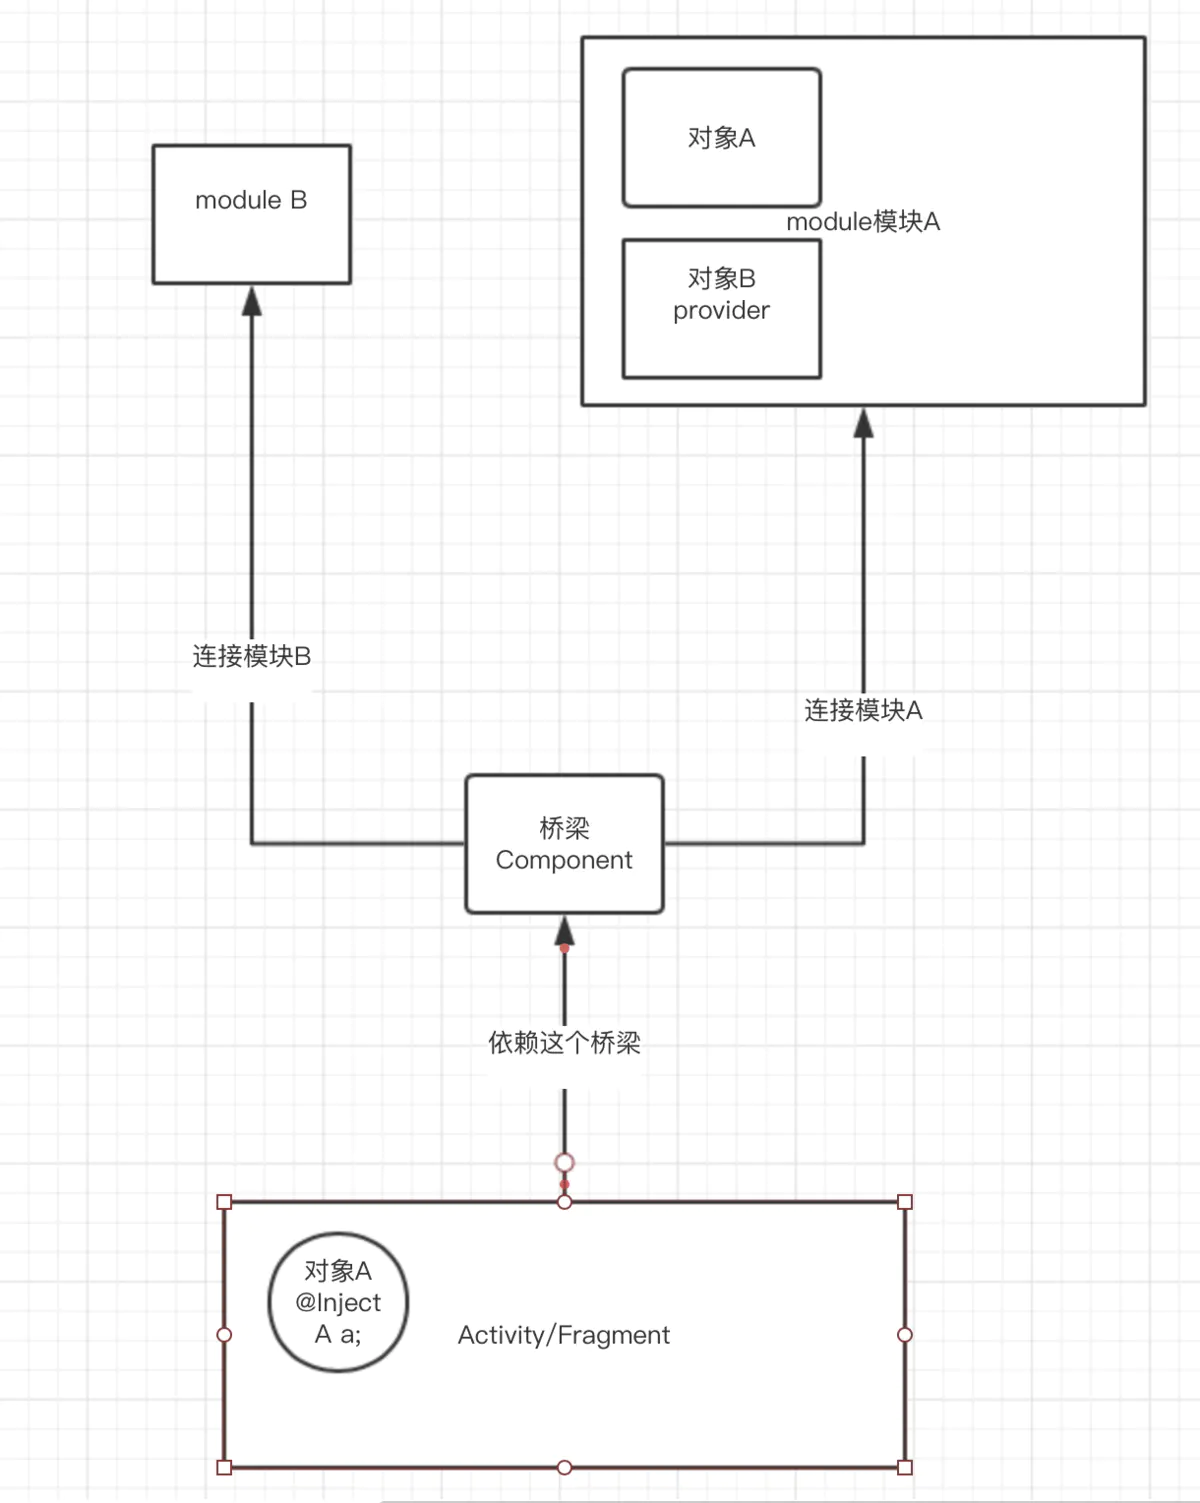
模块与模块之间的联系
1 | @Module (includes = {BModule.class})// includes 引入) |
一个Component 应用多个 module
1 | @Component(modules = {AModule.class,BModule.class}) |
dependencies 依赖其他Component
1 | @Component(modules = {MainModule.class}, dependencies = AppConponent.class) |
Provider 注入
有时候不仅仅是注入单个实例,我们需要多个实例,这时可以使用注入Provider
1 | public class CarFactory { |
Lazy 延迟注入
有时我们想注入的依赖在使用时再完成初始化,加快加载速度,就可以使用注入Lazy1
2
3
4
5
6
7
8
9
10public class Man {
@Inject
Lazy<Car> lazyCar;
public void goWork() {
...
lazyCar.get().go(); // lazyCar.get() 返回 Car 实例
...
}
}
Qualifier(限定符-别名)
试想这样一种情况:沿用之前的 Man 和 Car 的例子,如果 CarModule 提供了两个生成 Car 实例的 provide 方法,Dagger 2 在注入 Car 实例到 Man 中时应该选择哪一个方法呢?1
2
3
4
5
6
7
8
9
10
11
12@Module
public class CarModule {
@Provides
static Car provideCar1() {
return new Car1();
}
@Provides
static Car provideCar2() {
return new Car2();
}
// Car1 和 Car2 是 Car 的两个子类
}
这时 Dagger 2 不知道使用provideCar1还是provideCar2提供的实例,在编译时就会报错,这种情况也可以叫依赖迷失(网上看到的叫法)。而@Qualifier注解就是用来解决这个问题,使用注解来确定使用哪种 provide 方法。
下面是自定义的@Named注解,你也可以用自定义的其他 Qualifier 注解:1
2
3
4
5
6@Qualifier
@Documented
@Retention(RUNTIME)
public @interface Named {
String value() default "";
}
在 provide 方法上加上@Named注解,用来区分1
2
3
4
5
6
7
8
9
10
11
12
13@Module
public class CarModule {
@Provides
@Named("car1")
static Car provideCar1() {
return new Car1();
}
@Provides
@Named("car2")
static Car provideCar2() {
return new Car2();
}
}
还需要在 Inject 注入的地方加上@Named注解,表明需要注入的是哪一种 Car:1
2
3
4
5
6public class Man {
@Inject
@Named("car1")
Car car;
...
}
这样在依赖注入时,Dagger 2 就会使用provideCar1方法提供的实例,所以Qualifier(限定符)的作用相当于起了个区分的别名。
Scope
Scope 是用来确定注入的实例的生命周期的,如果没有使用 Scope 注解,Component 每次调用 Module 中的 provide 方法或 Inject 构造函数生成的工厂时都会创建一个新的实例,而使用 Scope 后可以复用之前的依赖实例。
在Dagger 2中
1、@Singleton可以保持类的单例。
2、@ApplicationScope注解的Component类与Applicaiton对象的生命周期一致。
3、@ActivityScope注解的Component类与Activity的生命周期一致
scope可以给我们带来“局部单例”,生命周期取决于scope自己。
在 Dagger 2 官方文档中我找到一句话,非常清楚地描述了@Scope的原理:
When a binding uses a scope annotation, that means that the component object holds a reference to the bound object until the component object itself is garbage-collected.
Scope 作用域的本质:Component 间接持有依赖实例的引用,把实例的作用域与 Component 绑定,它们不是同年同月同日生,但是同年同月死。
自定义@Scope
对于Android,我们通常会定义一个针对整个Activity的注解,通过仿照@Singleton
@Scope
@Documented
@Retention(RUNTIME)
public @interface ActivityScope {}
你可能会发现,这个自定义的@Scope和@Singleton代码完全一样,具有实现单例模式的功能。那干嘛还自定义@Scope,好处如下:
更好的管理ApplicationComponent和Module之间的关系,Component和Component之间的依赖和继承关系。如果关系不匹配,在编译期间会报错,详细下面会介绍。
代码可读性,让程序猿更好的了解Module中创建的类实例的使用范围。
Singleton Scope
@Singleton顾名思义保证单例
Reusable Scope
只单纯缓存依赖的实例,可以复用之前的实例,不关心与之绑定是什么 Component,Reusable 作用域只需要标记目标类或 provide 方法,不用标记 Component。
Releasable references(可释放引用)
使用 Scope 注解时,Component 会间接持有绑定的依赖实例的引用,也就是说实例在 Component 还存活时无法被回收。而在 Android 中,应该尽量减少内存占用,把没有使用的对象释放,这时可以用@CanReleaseReferences标记 Scope 注解。
然后在 Application 中注入ReleasableReferenceManager对象,在内存不足时调用releaseStrongReferences()方法把 Component 间接持有的强引用变为弱引用。1
2
3
4
5
6
7
8
9
10
11
12public class MyApplication extends Application {
@Inject
@ForReleasableReferences(MyScope.class)
ReleasableReferenceManager myScopeReferences;
@Override
public void onLowMemory() {
super.onLowMemory();
myScopeReferences.releaseStrongReferences();
}
...
}
这样在内存不足时,Component间接持有的实例为弱引用,如果没有其他对象使用的话就可以被回收。
使用@Scope的一些经验:
1、@Component关联的@Module中的任何一个@Provides有@scope,则该整个@Component要加上这个scope。否则在暴露或者注入时(不暴露且不注入时,既不使用它构造对象时,不报错),会有如下错误:
Error:(13, 1) 错误: cn.xuexuan.newui.di.component.ActivityComponent (unscoped) may not reference scoped bindings:
@Singleton @Provides android.app.Activity cn.xuexuan.newui.di.module.ActivityModule.getActivity()
2、 @Component的dependencies与@Component自身的scope不能相同;
@Singleton的组件不能依赖其他scope的组件,但是其他scope的组件可以依赖@Singleton组件;
没有scope的不能依赖有scope的组件。
否则出现下面错误:
Error:(21, 1) 错误: com.android.example.devsummit.archdemo.di.component.MyTestComponent (unscoped) cannot depend on scoped components:
@com.android.example.devsummit.archdemo.di.scope.ActivityScope com.android.example.devsummit.archdemo.di.component.MyTestComponentX
3、一个component不能同时有多个scope(Subcomponent除外),否则出现下面的错误
Error:Execution failed for task ‘:app:compileDebugJavaWithJavac’.
java.lang.IllegalArgumentException: com.android.example.devsummit.archdemo.di.component.MyTestComponent was annotated with more than one @Scope annotation
@BindsInstance
Component 可以在创建 Component 的时候绑定依赖实例,用以注入。这就是@BindsInstance注解的作用,只能在 Component.Builder 中使用。
@Module
public final class HomeActivityModule {
    private final HomeActivity activity;

    public HomeActivityModule(HomeActivity activity) {
        this.activity = activity;
    }

    @Provides
    @ActivityScope  // 自定义作用域
    Activity provideActivity() {
        return activity;
    }
}
而使用@BindsInstance的话会更加简单:1
2
3
4
5
6
7
8
9
10
11
12
13@ActivityScope
@Component
public interface HomeActivityComponent {
@Component.Builder
interface Builder {
@BindsInstance
Builder activity(Activity activity);
HomeActivityComponent build();
}
}
注意在调用build()创建 Component 之前,所有@BindsInstance方法必须先调用。上面例子中 HomeActivityComponent 还可以注入 Activity 类型的依赖,但是不能注入 HomeActivity,因为 Dagger 2 是使用具体类型作为依据的(也就是只能使用@Inject Activity activity而不是@Inject HomeActivity activity)。
如果@BindsInstance方法的参数可能为 null,需要再用@Nullable标记,同时标注 Inject 的地方也需要用@Nullable标记。这时 Builder 也可以不调用@BindsInstance方法,这样 Component 会默认设置 instance 为 null
注意:dagger.android 扩展库可以极大地简化在 Android 项目中使用 Dagger 2 的过程,但是还是有些限制,SubComponent.Builder 不能自定义 @BindsInstance 方法,SubCompoennt 的 Module 不能有含参数的构造函数,否则AndroidInjection.inject(this)在创建 SubComponent 时无法成功。
Component 的组织关系
Component 管理着依赖实例,根据依赖实例之间的关系就能确定 Component 的关系。这些关系可以用object graph描述,我称之为依赖关系图。在 Dagger 2 中 Component 的组织关系分为两种:
依赖关系,一个 Component 依赖其他 Compoent 公开的依赖实例,用 Component 中的dependencies声明。
继承关系,一个 Component 继承(也可以叫扩展)某 Component 提供更多的依赖,SubComponent 就是继承关系的体现。
依赖关系
示例代码:1
2
3
4
5
6
7
8
9
10
11
12
13
14
15
16
17
18
19
20
21@ManScope
@Component(modules = CarModule.class)
public interface ManComponent {
void inject(Man man);
Car car(); //必须向外提供 car 依赖实例的接口,表明 Man 可以借 car 给别人
}
@FriendScope
@Component(dependencies = ManComponent.class)
public interface FriendComponent {
void inject(Friend friend);
}
ManComponent manComponent = DaggerManComponent.builder()
.build();
FriendComponent friendComponent = DaggerFriendComponent.builder()
.manComponent(manComponent)
.build();
friendComponent.inject(friend);
依赖关系就跟生活中的朋友关系相当,注意事项如下:
被依赖的 Component 需要把暴露的依赖实例用显式的接口声明,如上面的Car car(),我们只能使用朋友愿意分享的东西。
依赖关系中的 Component 的 Scope 不能相同,因为它们的生命周期不同。
继承关系
示例如下:1
2
3
4
5
6
7
8
9
10
11
12
13
14
15
16
17
18
19
20
21
22
23
24
25
26
27
28
29
30
31
32
33
34@Module(subcomponents = SonComponent.class)
public class CarModule {
@Provides
@ManScope
static Car provideCar() {
return new Car();
}
}
@ManScope
@Component(modules = CarModule.class)
public interface ManComponent {
//void inject(Man man); // 继承关系中不用显式地提供暴露依赖实例的接口
SonComponent.Builder sonComponent(); // 用来创建 Subcomponent
}
@SonScope
@SubComponent(modules = BikeModule.class)
public interface SonComponent {
void inject(Son son);
@Subcomponent.Builder
interface Builder { // SubComponent 必须显式地声明 Subcomponent.Builder,parent Component 需要用 Builder 来创建 SubComponent
SonComponent build();
}
}
ManComponent manComponent = DaggerManComponent.builder()
.build();
SonComponent sonComponent = manComponent.sonComponent()
.build();
sonComponent.inject(son);
在 parent Component 依赖的 Module 中的subcomponents加上 SubComponent 的 class,然后就可以在 parent Component 中请求 SubComponent.Builder。但却无法访问 SubComponent 中的依赖。
继承关系和依赖关系最大的区别就是:继承关系中不用显式地提供依赖实例的接口,SubComponent 继承 parent Component 的所有依赖。
依赖关系 vs 继承关系
相同点:
两者都能复用其他 Component 的依赖
有依赖关系和继承关系的 Component 不能有相同的 Scope
区别:
依赖关系中被依赖的 Component 必须显式地提供公开依赖实例的接口,而 SubComponent 默认继承 parent Component 的依赖。
依赖关系会生成两个独立的 DaggerXXComponent 类,而 SubComponent 不会生成 独立的 DaggerXXComponent 类。
在 Android 开发中,Activity 是 App 运行中组件,Fragment 又是 Activity 一部分,这种组件化思想适合继承关系,所以在 Android 中一般使用 SubComponent。
重复的 Module
当相同的 Module 注入到 parent Component 和它的 SubComponent 中时,则每个 Component 都将自动使用这个 Module 的同一实例。也就是如果在 SubComponent.Builder 中调用相同的 Module 或者在返回 SubComponent 的抽象工厂方法中以重复 Module 作为参数时,会出现错误。(前者在编译时不能检测出,是运行时错误)1
2
3
4
5
6
7
8
9
10
11
12
13
14
15
16
17
18
19
20
21@Component(modules = {RepeatedModule.class, ...})
interface ComponentOne {
ComponentTwo componentTwo(RepeatedModule repeatedModule); // 编译时报错
ComponentThree.Builder componentThreeBuilder();
}
@Subcomponent(modules = {RepeatedModule.class, ...})
interface ComponentTwo { ... }
@Subcomponent(modules = {RepeatedModule.class, ...})
interface ComponentThree {
@Subcomponent.Builder
interface Builder {
Builder repeatedModule(RepeatedModule repeatedModule);
ComponentThree build();
}
}
DaggerComponentOne.create().componentThreeBuilder()
.repeatedModule(new RepeatedModule()) // 运行时报错 UnsupportedOperationException!
.build();
dagger.android 扩展库的使用
dagger.android 扩展库是为了简化 Dagger 2 在 Android 的使用。
引入 dagger.android 扩展库
1 | // dagger 2 |
从上面可以看出 dagger.android 扩展库有单独的注解处理器 dagger-android-processor。
注入 Activity 中的依赖
以 SearchActivity 为例,说明 dagger.android 的使用:
1.在 AppComponent 中安装 AndroidInjectionModule,确保包含四大组件和 Fragment 的注入器类型。1
2
3@Singleton
@Component(modules = [AppModule::class, AndroidInjectionModule::class])
interface AppComponent { ... }
2.Activity 对应的 SubComponent 实现 AndroidInjector1
2
3
4
5
6@ActivityScope
@Subcomponent
interface SearchActivitySubcomponent : AndroidInjector<SearchActivity> {
@Subcomponent.Builder
abstract class Builder : AndroidInjector.Builder<SearchActivity>()
}
3.在定义 SubComponent 后,添加一个 ActivityBindModule 用来绑定 subcomponent builder,并把该 module 安装到 AppComponent 中。1
2
3
4
5
6
7
8
9
10
11
12@Module(subcomponents = [SearchActivitySubcomponent::class])
abstract class ActivityBindModule {
@Binds
@IntoMap
@ActivityKey(SearchActivity::class)
abstract fun bindAndroidInjectorFactory(
builder: SearchActivitySubcomponent.Builder): AndroidInjector.Factory<out Activity>
}
@Singleton
@Component(modules = [AppModule::class, AndroidInjectionModule::class, ActivityBindModule::class])
interface AppComponent { ... }
如果 SubComponent 和其 Builder 没有其他方法或没有继承其他类型,可以使用 @ContributesAndroidInjector 注解简化第二步和第三步,在一个抽象 Module 中添加一个使用 @ContributesAndroidInjector 注解标记的返回具体的 Activity 类型的抽象方法,还可以在 ContributesAndroidInjector 注解中标明 SubComponent 需要安装的 module。如果 SubComponent 需要作用域,只需要标记在该方法上即可。1
2
3
4
5
6
7
8
9
10@Module
abstract class ActivityBindModule {
@ActivityScope
@ContributesAndroidInjector
abstract fun searchActivityInjector(): SearchActivity
}
@Singleton
@Component(modules = [AppModule::class, AndroidInjectionModule::class, ActivityBindModule::class])
interface AppComponent { ... }
4.Application 类实现 HasActivityInjector 接口,并且注入一个 DispatchingAndroidInjector1
2
3
4
5
6
7
8
9
10
11
12
13
14
15class GankApp : Application(), HasActivityInjector {
@Inject
lateinit var dispatchingActivityInjector: DispatchingAndroidInjector<Activity>
override fun onCreate() {
super.onCreate()
DaggerAppComponent.builder()
.appModule(AppModule(this))
.build()
.inject(this)
}
override fun activityInjector() = dispatchingActivityInjector
}
5.最后在 onCreate)() 方法中,在 super.onCreate() 之前调用 AndroidInjection.inject(this)。1
2
3
4
5
6
7
8
9class SearchActivity : BaseActivity() {
override fun onCreate(savedInstanceState: Bundle?) {
AndroidInjection.inject(this)
super.onCreate(savedInstanceState)
...
}
}
使用 dagger.android 后 Activity 对应的 SubComponent 的定义简化如下:1
2
3
4
5
6
7
8
9
10
11
12
13
14@Module
abstract class ActivityBindModule {
@ActivityScope
@ContributesAndroidInjector(modules = [FragmentBindModule::class])
abstract fun mainActivityInjector(): MainActivity
@ActivityScope
@ContributesAndroidInjector
abstract fun pictureActivityInjector(): PictureActivity
@ActivityScope
@ContributesAndroidInjector
abstract fun searchActivityInjector(): SearchActivity
}
其中 @ContributesAndroidInjector 注解可以解决之前的两个问题,不需要手动创建每一个 SubComponent,也不用在 parent componenet 声明对应的返回对应的 SubComponent.Builder 的接口,以后添加 SubComponent 只需要添加一个 ContributesAndroidInjector 抽象方法。
然后使用AndroidInjection.inject(this) 来简化注入依赖的过程,隐藏注入依赖的细节。
注入 Fragment 和其他三大组件也是类似,只是 ContributesAndroidInjector 抽象方法的返回值变了,HasActivityInjector 接口换做 HasFragmentInjector 等接口。
小结
dagger.android 扩展库可以极大地简化在 Android 项目中使用 Dagger 2 的过程,但是还是有些限制,SubComponent.Builder 不能自定义 @BindsInstance 方法,SubCompoennt 的 Module 不能有含参数的构造函数,否则AndroidInjection.inject(this)在创建 SubComponent 时无法成功。
在使用过 dagger.android 扩展库一段时间后,个人认为其设计非常优雅,简化了 SubComponent 的定义过程和依赖注入的过程,使得开发者可以专注于 Module 管理依赖对象,所以建议大家在 Android 项目中使用。
@Binds
@Binds:可以理解为关联,首先它是跟@Provides使用地方是一样的,不同的在于@Provides 注解的方法都是有具体实现的,而@Binds修饰的只有方法定义,并没有具体的实现的,在方法定义中方法参数必须是 返回值的实现类。这样创建实体类的地方就不用在Modules 中实现了,例如:1
2
3
4
5
6
7
8
9
10
11
12
13
14
15
16
17
18
19
20
21
22
23
24
25
26
27
28
29
30
31
32
33
34
35
36
37
38
39
40
41
42
43
44
45
46
47
48
49
50
51
52
53
54@Module
public abstract class AppModule {
@Binds
@Named("AppManager")
abstract IAppManager bindAppManager(AppManager appManager);
@Provides
static Retrofit provideRetrofit() {
return new Retrofit.Builder().build();
}
}
@Component(modules = AppModule.class)
public interface AppComponent {
Application application();
Retrofit retrofit();
void inject(Application application);
@Component.Builder
interface Builder {
@BindsInstance
Builder application(Application application);
AppComponent build();
}
}
public class AppManager implements IAppManager {
@Inject
Application application;
@Inject
public AppManager() {
}
}
public class MyApplication extends Application {
@Override
public void onCreate() {
super.onCreate();
// 注入
DaggerAppComponent.builder().application(this).build().inject(this);
}
}
Module 中不一定要具体实现,可以用@Binds关联实体,这样在编译过程中会自动创建Fractory 以及实现的,AccountManagerDelegate中还可以使用该Module中 @Provides 提供的实体类
这里使用 provideXXX() 方式提供接口实例,说明几点:
- 方法中必须有参数且只能有一个,是接口的实现类
- 实现类必须提供@Inject的构造或 Module中@Provides形式提供
- 方法是抽象方法,不必写方法体
- 使用@Binds代替@Provides
- 由于方法是抽象的,所以类也要抽象或接口
@IntoSet
使用注入形式初始化 Set 集合时,可以在 Module 中多次定义一系列返回值类型相同的方法:1
2
3
4
5
6
7
8
9
10@Module
class AnimalModule {
@IntoSet
@Provides
fun provideElephant() = Animal("大象")
@Provides
@IntoSet
fun provideMonkey() = Animal("猴子")
}
Animal.kt 代码:1
class Animal(var name: String)
上面的 provideElephant() 和 provideMonkey() 返回值类型都是 Animal,都使用了@IntoSet注释,多说一句,@Provides当然也要有,如果是接口用@Binds。
初始化并使用:1
2
3
4
5
6
7
8@Inject
lateinit var set: MutableSet<Animal>
...//代码省略
set.forEach {
Log.i("Main", "--- ${it.name} ---")
}
kotlin 里面 MutableSet 代替 Java 中的 Set,上面代码运行可以输出:1
2--- 大象 ---
--- 猴子 ---
@IntoMap
与@IntoSet区别不大,Map 多了一个 key1
2
3
4
5
6
7
8
9@Provides
@IntoMap
@IntKey(0)
fun provideFish() = Animal("鱼")
@Provides
@IntoMap
@IntKey(1)
fun provideHuman() = Animal("人")
@IntKey里面就是 Map 中的 key,providesXXX() 返回值是 key 对应的 value,如果 key 是 String 类型的,则使用@StringKey()输入 key,此外,还可以自定义 key:1
2
3
4
5@Documented
@Target(ElementType.METHOD)
@Retention(RetentionPolicy.RUNTIME)
@MapKey
annotation class ZhuangBiKey(val f: Float)
初始化 map 并使用:1
2
3
4
5
6
7
8@Inject
lateinit var map: Map<Int, Animal>
...//代码省略
map.forEach {
Log.i("Main", "--- key:${it.key}\nvalue:${it.value.name} ---")
}
参考资料
Dagger 2 完全解析
打破Dagger2使用窘境:Dagger-Android详解(https://github.com/qingmei2/Sample_dagger2)
dagger组件化